
Drawing with guidelines helps you place forms, proportions, and perspective with far more accuracy.
Drawing with guidelines is one of the simplest skills that can level up your art fast. It gives you a clear plan before you commit to final lines, which means fewer crooked features, better balance, and cleaner compositions. If you want to draw with more confidence and less guesswork, this guide will show you how guidelines work, why they matter, and how to use them in a practical way.
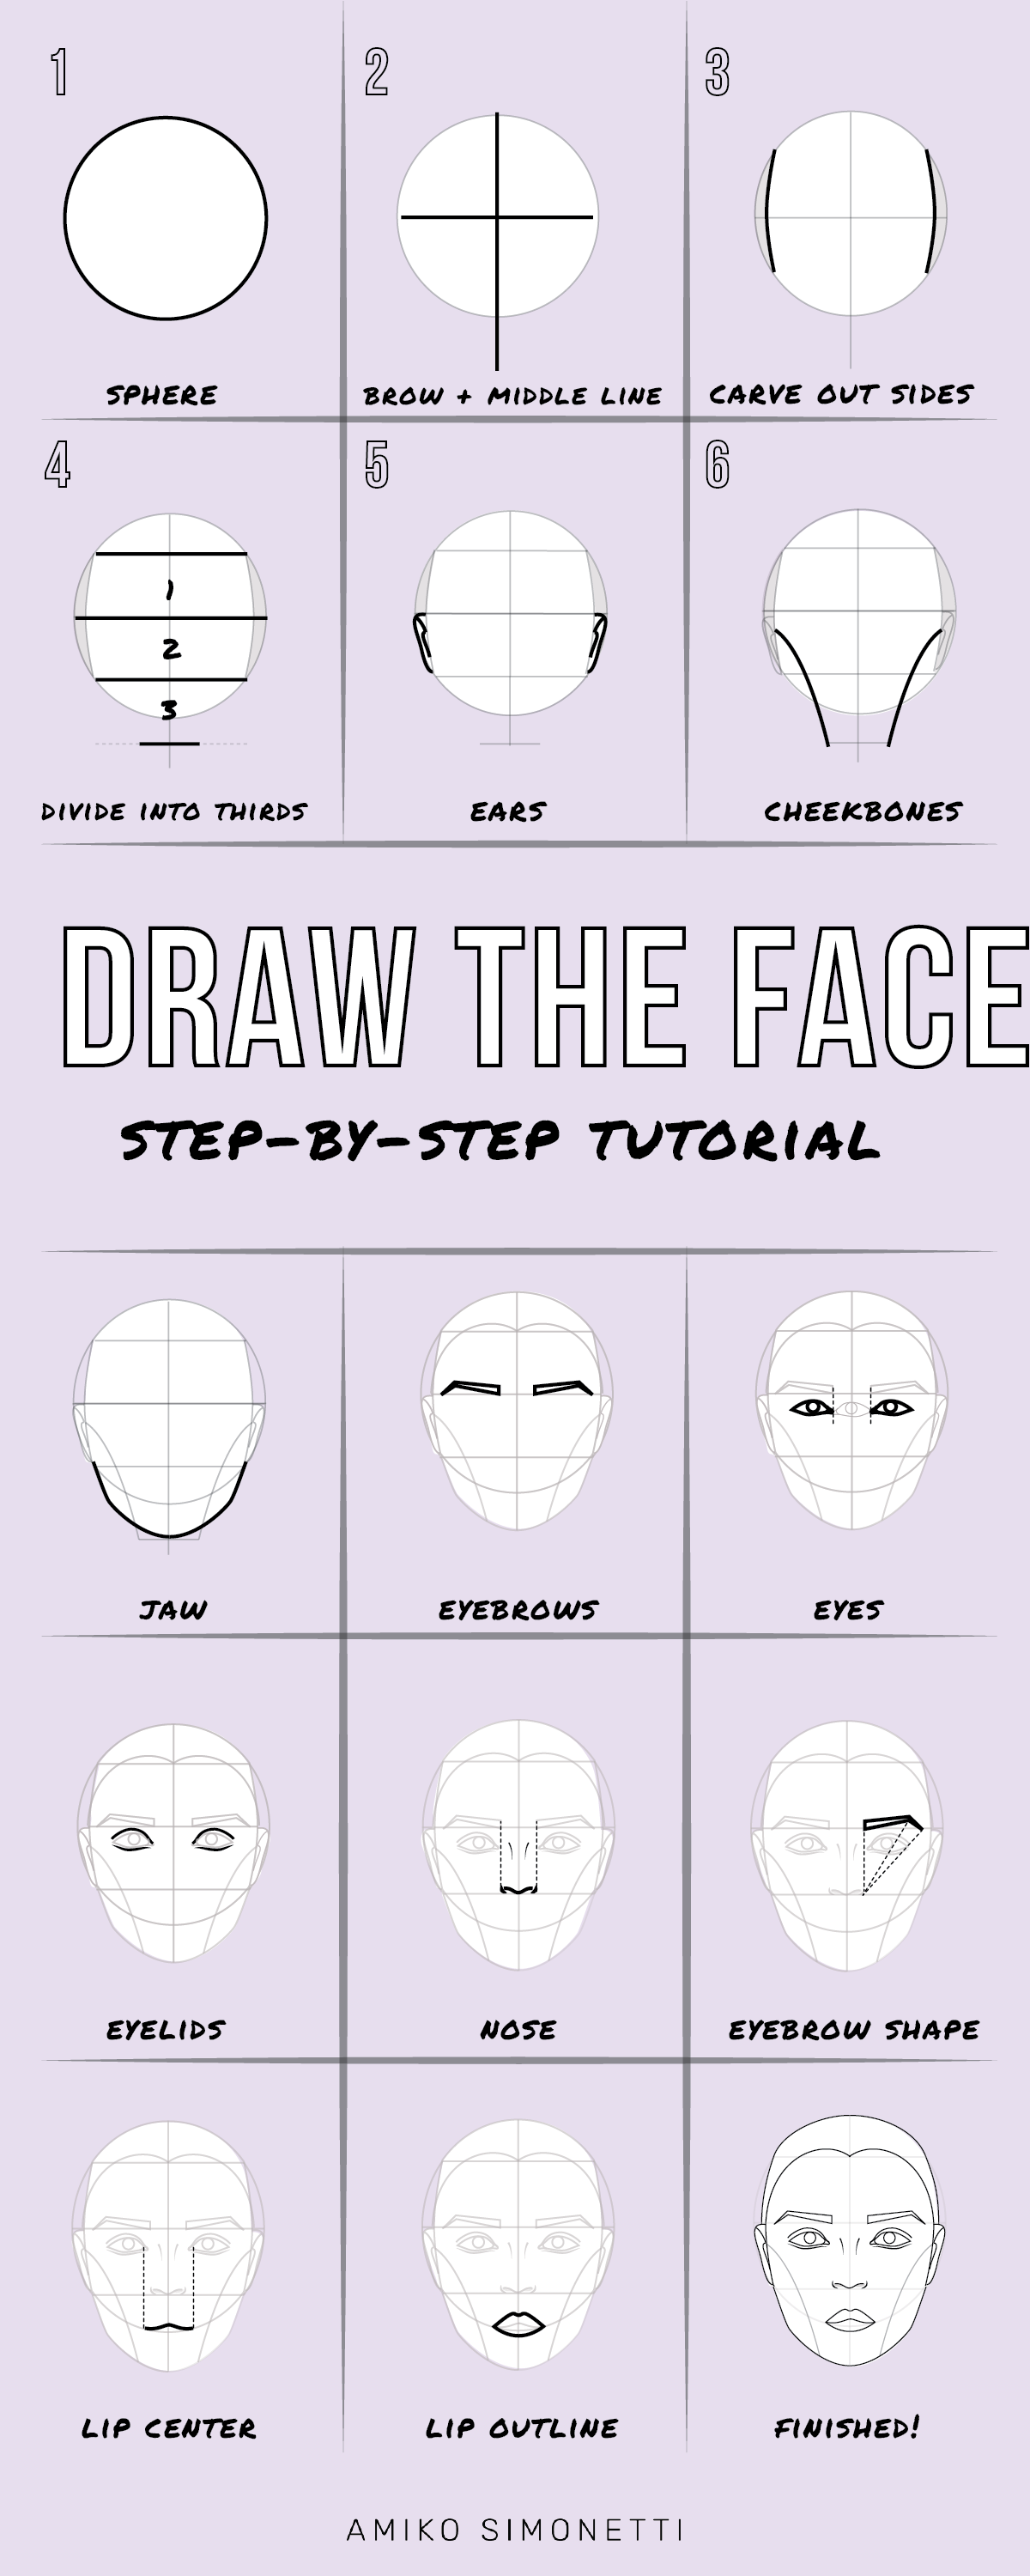
What drawing with guidelines really means
Drawing with guidelines means using light, temporary marks to map out the structure of an image before adding details. These marks can be straight lines, curves, axes, boxes, grids, or simple shapes. They act like a scaffold for your drawing, helping you place everything in the right spot.
In my own early sketching days, I used to jump straight into details. That almost always led to uneven eyes, tilted heads, and objects that felt “off” even when I could not explain why. Once I started drawing with guidelines, my drawings became easier to control, and my mistakes became smaller and faster to fix.
Guidelines are not about making art stiff. They are about making the process calmer and more accurate. Think of them like a roadmap: you can still take creative turns, but you know where the road starts and where it should end.
Why guidelines matter in drawing
Guidelines help you build structure before style. That matters because strong art usually starts with strong placement, not fancy details. Even loose sketching becomes easier when the big shapes are right first.
Here are the biggest benefits of drawing with guidelines:
- Better proportion: You can compare the size of one part to another before committing.
- Cleaner perspective: Objects sit more naturally in space.
- Faster corrections: It is easier to adjust a light guideline than a dark final line.
- More confidence: You spend less time guessing and more time deciding.
- Stronger composition: You can place your subject where it feels balanced.
Art teachers, figure drawing instructors, and draft-based design workflows all rely on the same idea: structure first, detail second. That is one reason guidelines are common in figure drawing, character art, architecture sketching, and product design.
The main types of drawing guidelines
Different drawings need different kinds of structure. The good news is that you do not need dozens of tools. A few basic guideline types can support almost any sketch.
Straight guidelines
Straight guidelines are used for alignment, symmetry, and perspective. They help you keep lines level and objects consistent. You will use them often for faces, buildings, furniture, and mechanical forms.
Curved guidelines
Curved guidelines help with round forms like heads, limbs, cups, and flowing shapes. They are useful when an object turns in space. A curved center line, for example, can show the direction of a head or torso.
Cross-contour guidelines
Cross-contour lines wrap around a form. They show volume and direction. These are especially helpful when drawing spheres, cylinders, muscles, or any object that needs a sense of three-dimensional space.
Construction shapes
Construction shapes are simple forms like circles, boxes, cones, and cylinders. They are the backbone of many drawings. If you can break a complex object into basic shapes, you can usually draw it more accurately.
Grid guidelines
A grid helps with placement and measurement. It is especially useful for portraits, copied references, and technical drawing. Many artists use grids to keep features and landmarks consistent.
How to start drawing with guidelines
The best way to start is to keep your marks light and simple. Your goal is not to finish the drawing in one pass. Your goal is to build a strong base.
Follow these steps:
-
Observe the subject first
Look at the big shapes before the details. Ask yourself what the overall structure looks like. -
Mark the main axis
A central line can show tilt, direction, or balance. For a face, this often helps place the nose, mouth, and chin. -
Block in simple shapes
Use circles, boxes, or ovals to map the major parts. Keep them loose. -
Compare proportions
Check the size relationship between parts. For example, compare head width to jaw width or chair height to table height. -
Add cross-lines and landmarks
Use lines to locate key points like eyes, shoulder width, or vanishing direction. -
Refine slowly
Once the structure feels right, start tightening the forms and adding detail.
A helpful habit is to treat guidelines like whisper-level pencil marks. If they are too dark, they can lock you in too soon. Light lines give you freedom to change your mind.
Drawing with guidelines for faces and portraits
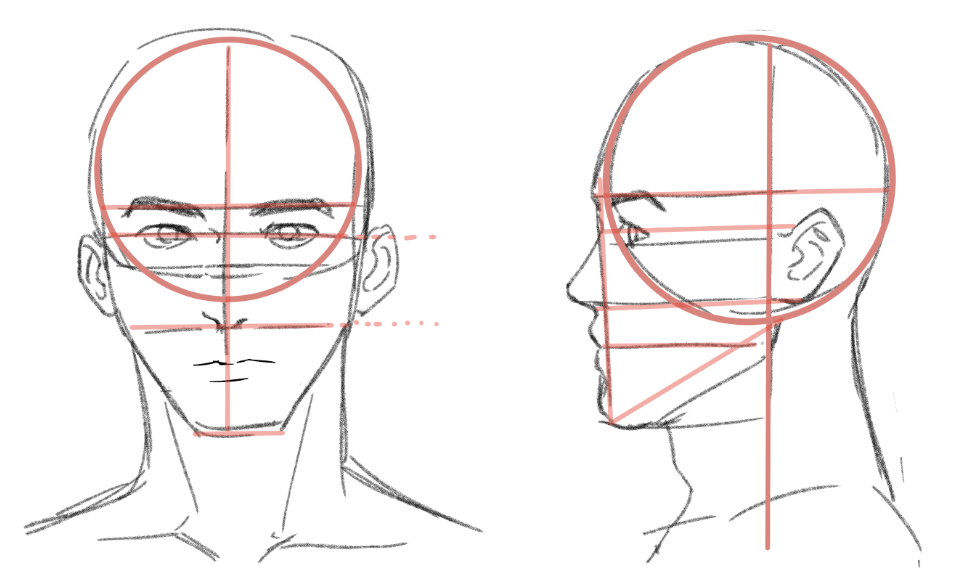
Portrait drawing is where guidelines shine the most. Faces look simple at first, but the spacing of each feature matters a lot. A tiny shift in eye level or mouth angle can change the whole expression.
A common portrait setup uses these basics:
- A center line for the face direction
- An eye line for alignment
- A brow line to anchor the upper face
- A nose base line for lower feature placement
- A mouth line for expression and proportion
From my experience, the biggest beginner mistake is placing features by feeling instead of measuring. The face may look “close enough,” but the drawing still feels strange. Guidelines solve that by giving each feature a clear home.
A few portrait tips:
- Keep the head shape simple at first
- Use the center line to show the head turn
- Place both eyes on the same plane unless perspective says otherwise
- Check the distance between eyes, nose, and mouth
- Watch the angle of the jaw and chin
Portrait artists often say that the head is not a flat circle. That is true. Drawing with guidelines helps you wrap the face around a real 3D form instead of a flat mask.
Drawing with guidelines for figure drawing
Figure drawing becomes much easier when you focus on structure before anatomy. The body is full of rhythm, but it still needs balance. Guidelines help you understand pose, weight, and movement.
A solid figure drawing process often includes:
- A line of action to capture movement
- A simple torso shape
- A pelvis shape for balance
- Limb lines for direction
- Joint markers for elbows, knees, and ankles
The line of action is one of the most useful guidelines in figure drawing. It is the main flow line that gives the pose energy. Even a static pose feels more alive when this line is clear.
One practical lesson I learned the hard way: if the pelvis and shoulders do not support each other well, the pose collapses visually. Guidelines help you notice that early, before you waste time on muscles or clothing folds.
Drawing with guidelines for perspective
Perspective can be intimidating, but guidelines make it manageable. In simple terms, perspective helps objects look like they exist in space instead of floating on the page. Guidelines let you map that space before you draw details.
The most useful perspective tools include:
- Horizon line: Shows eye level
- Vanishing points: Help lines converge correctly
- Box guides: Build objects in three dimensions
- Measuring lines: Keep repeated forms consistent
If you are drawing buildings, roads, rooms, or interiors, these tools are a big help. Even a simple box drawn with perspective guidelines can improve your sense of depth.
A useful mental image is this: guidelines are like invisible strings pulling objects into place. When they are right, the whole drawing feels grounded. When they are wrong, everything starts to tilt in strange ways.
Common mistakes when drawing with guidelines
Guidelines are helpful, but they can also be misused. The most common issue is overworking them. Some artists get stuck in planning mode and never move into the actual drawing.
Watch out for these mistakes:
- Making guidelines too dark: This makes cleanup harder.
- Using too many lines: Too much structure can clutter the sketch.
- Ignoring proportion checks: Guidelines only help if you compare sizes.
- Skipping the big shapes: Details cannot fix a weak base.
- Drawing too tightly: Tight early lines reduce flexibility.
Another mistake is treating guidelines as rules instead of tools. They should support your choices, not trap you. If the drawing needs a small artistic shift, adjust the structure instead of forcing it to match the first line.
Best tools for drawing with guidelines
You do not need expensive supplies to use guidelines well. A simple pencil and paper can do the job. Still, the right tools can make the process smoother.
Helpful tools include:
- HB or 2H pencil for light construction
- Eraser for correcting early shapes
- Ruler for straight perspective lines
- Sketchbook with smooth paper
- Digital drawing tablet with low-opacity sketch layers
In digital art, guidelines are often drawn on separate layers. That makes cleanup easy and keeps the workflow organized. In traditional art, lighter pencils and gentle pressure do the same job.
The tool matters less than the habit. A cheap pencil with good structure is better than an expensive tool used with no plan.
How to practice drawing with guidelines every day
Practice works best when it is short and focused. You do not need hours of study to improve. Ten to twenty minutes of structured repetition can do a lot over time.
Try these practice ideas:
- Draw five heads using only guidelines
- Sketch ten boxes in different angles
- Practice simple figure poses with a line of action
- Copy household objects using construction shapes
- Redraw the same subject twice, with and without guidelines
One of the best habits I have used is this: do a first pass with clear guidelines, then do a second pass with fewer lines. That helps you see which parts of your structure matter most and which marks were just noise.
If you want faster progress, review your own sketches. Look for repeated issues like tilted eyes, uneven spacing, or weak perspective. Guidelines make those patterns easier to spot.
When to remove or reduce guidelines
Not every drawing needs visible guidelines in the final stage. Once the structure is stable, you can erase or reduce them. The goal is to keep the useful parts and let the finished lines breathe.
This is especially important in clean illustration, ink work, or finished character art. If the sketch lines are too heavy, they can distract from the final piece. A good rule is to keep them light until you are sure of the placement.
Some artists leave a little structure visible in the final work on purpose. That can create energy and freshness. Others clean everything up for a polished result. Both are valid. The right choice depends on your style and intent.
Real-world examples of drawing with guidelines
Guidelines show up in many forms of visual work. They are not just for beginners. Professionals use them constantly, even if they are hidden under the final image.
Examples include:
- Comic art: Artists use head shapes, body axes, and perspective boxes.
- Concept art: Designers block in silhouettes and large forms first.
- Architecture sketching: Buildings are mapped with vanishing lines and grids.
- Animation: Character poses often begin with gesture and construction lines.
- Technical drawing: Precision depends on measured guide structures.
This is one reason guidelines are so trusted. They support both loose sketching and precise drafting. The method changes a little, but the principle stays the same.
Frequently Asked Questions of drawing with guidelines
What are guidelines in drawing?
Guidelines are light planning lines that help place shapes, features, and proportions before the final drawing. They keep the sketch organized and make it easier to correct mistakes early.
Do professional artists use drawing guidelines?
Yes, many do. Professionals often use guidelines, even if they hide them under the finished art, because they save time and improve accuracy.
Should guidelines be erased completely?
Not always. In clean work, most are removed or softened, but some artists leave light structure lines if it supports the style. It depends on the look you want.
What is the easiest way to practice drawing with guidelines?
Start with simple objects like faces, boxes, and basic figures. Use light construction lines, compare proportions, and repeat the same subject several times.
Can drawing with guidelines help beginners?
Yes, very much. It gives beginners a clear process and reduces guesswork, which makes drawing feel less overwhelming and more manageable.
Conclusion
Drawing with guidelines is one of the most practical skills you can build as an artist. It improves proportion, supports perspective, and gives you a clearer path from rough idea to finished drawing. More importantly, it helps you draw with less stress and more control.
If you want to improve faster, make guidelines part of every sketch, even the small ones. Keep them light, keep them simple, and let them guide your hand instead of control it. Try applying these ideas in your next drawing session, and if you found this helpful, explore more drawing techniques or leave a comment with what you want to learn next.