
Solvent blending colored pencils softens pigment, smooths layers, and creates painterly effects fast.
If you have ever looked at a colored pencil drawing and wondered how it got that rich, almost painted finish, solvent blending colored pencils is often the secret. I have used this method for years on portraits, pet art, and landscape studies, and it can completely change the way your layers behave. In this guide, I’ll break down how solvent blending colored pencils works, which solvents are safest and most effective, and how to use it without ruining your paper or muddying your colors.
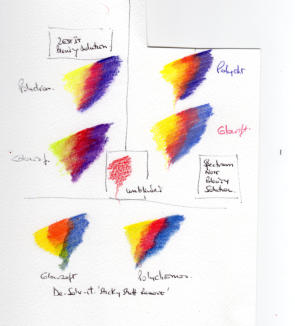
What solvent blending colored pencils means
Solvent blending colored pencils is a technique that uses a liquid to dissolve the binder in colored pencil pigment. That helps the color move, merge, and sink into the paper tooth more evenly. The result is a smoother finish with fewer visible pencil strokes.
This method is popular because it gives colored pencil art a softer, more polished look. It can also save time when you want rich coverage without pressing hard with the pencil. I still remember the first time I tested it on a shadow under a glass jar; the harsh grain disappeared in seconds, and the drawing suddenly looked more like a painting.
How solvent blending works
Colored pencils are made of pigment, wax or oil binder, and filler. When you add solvent blending colored pencils to the mix, the solvent breaks down the binder enough for the pigment to spread. Once the liquid evaporates, the pigment stays locked into the paper.
The key idea is simple:
• The pencil lays down pigment
• The solvent softens the binder
• The pigment spreads into the paper texture
• The paper dries with a smoother finish
Different papers react in different ways. Heavy, textured paper can take more solvent and more layers. Smooth paper may look polished, but it can buckle or saturate faster if you use too much liquid.
Why artists use solvent blending colored pencils
Artists reach for solvent blending colored pencils for both look and efficiency. It can make art feel more refined while keeping the control that pencils offer.
Common benefits include:
• Smoother gradients for skin, sky, fur, and fabric
• Less visible pencil grain
• Faster layering on large areas
• Deeper-looking color because pigment settles into the tooth
• Better ability to mix nearby colors directly on the page
In my own work, solvent blending colored pencils is especially useful when I need a soft transition, like cheek shading in portraits or distant hills in a landscape. It is not magic, though. It works best when you plan the layers before adding solvent.
Best solvents for colored pencil blending
Not every solvent works the same way. Some are mild and easy to control, while others can be stronger and more aggressive.
Here are the most common options:
• Odorless mineral spirits: A popular choice for many artists. It blends wax-based colored pencils well and usually evaporates cleanly.
• Turpentine: Stronger and more traditional, but it has a sharper smell and needs more ventilation.
• Citrus-based solvents: These can be effective and often smell softer, but they still need caution.
• Rubbing alcohol: Sometimes used on certain pencils and papers, though results vary a lot.
For most people, odorless mineral spirits are the easiest starting point for solvent blending colored pencils. They give good control and are widely used in art practice. I usually tell beginners to start small and test on scrap paper first, because paper choice matters almost as much as the solvent itself.
Which colored pencils work best with solvent blending
Solvent blending colored pencils works best with wax-based pencils, but many oil-based pencils can also respond well. The exact result depends on the pencil brand, pigment load, and binder formula.
Good candidates usually have:
• Rich pigment
• Smooth laydown
• Strong layering ability
• Good lightfastness ratings
Artist-grade pencils tend to perform better than student-grade pencils because they usually contain more pigment and less filler. That does not mean cheaper pencils cannot be blended, but you may need more layers to get the same depth. In my experience, soft-core pencils often melt into solvent more easily, while harder pencils can leave a more controlled finish.
Tools you need for solvent blending colored pencils
You do not need a huge kit to get started. A few simple tools are enough.
Useful supplies include:
• Colored pencils
• Odorless mineral spirits or another chosen solvent
• Small brush, cotton swab, or blending stump
• Scrap paper for testing
• Thick drawing paper or mixed-media paper
• Paper towel or tissue
• Masking tape to hold paper flat
A synthetic brush is one of the easiest tools for solvent blending colored pencils. It helps you place the solvent only where you want it. I usually keep one brush just for solvent so I do not damage my good watercolor brushes.
Step-by-step process for solvent blending colored pencils
The process is straightforward, but timing matters.
-
Lay down your first pencil layers
Start with light pressure. Build color slowly, because the solvent will pull pigment around and deepen the look. -
Add a bit more pigment than you think you need
Solvent blending colored pencils work better when there is enough pigment on the page. If the layer is too thin, the blend can look patchy. -
Apply solvent lightly
Use a small brush, swab, or blending tool. Touch the surface gently and let the liquid do the work. -
Let it dry fully
Do not rush the drying time. Wet paper can smear and damage the surface. -
Add more layers if needed
After drying, you can layer more pencil on top for richer shadows or sharper details. -
Repeat carefully
A second round of solvent blending colored pencils can deepen the effect, but too many passes can saturate the paper.
The biggest mistake I made early on was using too much solvent at once. It looked good for a minute, then the paper got overly wet and lost its clean shape. Less really is more here.
Best paper for solvent blending colored pencils
Paper choice can make or break the result. Solvent blending colored pencils need a surface that can hold pigment and stand up to liquid.
Best options include:
• Heavy mixed-media paper
• Bristol board with some tooth
• Hot press watercolor paper
• Heavy drawing paper designed for wet media
Look for paper that is thick enough to resist buckling. If the paper is too thin, the solvent can warp it or make the surface rough. A little tooth helps because it grabs the softened pigment and keeps the blend even.
Techniques for smoother results
You can improve solvent blending colored pencils with a few simple habits.
Try these methods:
• Use multiple light layers instead of one heavy layer
• Blend in small sections
• Follow the direction of the form, like along a cheek or leaf
• Use a clean brush so colors do not get muddy
• Keep a scrap sheet nearby to test solvent load
When I work on eyes or reflective surfaces, I often blend only part of the area. That keeps highlights crisp while still smoothing the midtones. It is a bit like painting with patience instead of force.
Common mistakes to avoid
Solvent blending colored pencils is forgiving in some ways, but easy to overdo.
Watch out for these problems:
• Using too much solvent
• Starting with too little pigment
• Working on weak paper
• Blending all colors together and losing contrast
• Not letting the layer dry before adding more pencil
Another mistake is forgetting that some colors are more stain-like than others. Reds, blues, and dark greens can become very intense after blending. If you want clean transitions, test the color mix first on a separate sheet.
Safety tips for solvent blending colored pencils
This part matters. Even odorless products should be used with care.
Safety basics:
• Work in a well-ventilated area
• Keep solvents away from open flames
• Use small amounts only
• Close containers tightly after use
• Wash hands after handling materials
• Store supplies out of reach of children and pets
I also recommend reading the product label before using any solvent. Some people are more sensitive to fumes than others, so what feels fine for one artist may not feel fine for another. Trust your body and stop if something smells too strong or feels irritating.
Creative effects you can make with solvent blending colored pencils
This technique is not just for smooth shading. It can also open up more expressive effects.
You can use solvent blending colored pencils for:
• Skin tones with soft transitions
• Pet fur with layered depth
• Clouds and skies with gentle fades
• Still life surfaces like glass or fruit
• Abstract backgrounds with washed color fields
One of my favorite uses is for fur. I lay in the base color, blend it lightly, then redraw small strands on top after it dries. That gives the fur both softness and texture, which is hard to get with dry pencil alone.
When not to use solvent blending colored pencils
Sometimes dry layering is the better choice. Solvent blending colored pencils are not ideal for every style or surface.
Skip or limit solvent when:
• You want crisp pencil texture
• The artwork is very small and detailed
• The paper is too thin
• You plan to use water-based media later
• The look should stay sketchy or grainy
If you like a visible pencil mark, solvent can remove the charm you were trying to keep. I often leave small areas unblended on purpose because those tiny pencil strokes can add life and energy.
FAQs about solvent blending colored pencils
What does solvent blending do to colored pencil drawings?
It dissolves the binder enough to move the pigment into the paper more evenly. This creates smoother shading, richer color, and fewer visible strokes.
Is solvent blending colored pencils safe for beginners?
Yes, if you use a small amount and work in a ventilated space. Odorless mineral spirits are a common starting point, but you should always follow safety instructions on the product label.
Can you use water instead of solvent for colored pencils?
Sometimes, but only with water-soluble colored pencils. Regular colored pencils do not blend well with water alone, so the result is usually weak or uneven.
Does solvent blending ruin colored pencil paper?
It can if the paper is too thin or if you use too much liquid. Heavier paper made for mixed media or drawing usually handles solvent better and gives more consistent results.
Which is better: dry blending or solvent blending colored pencils?
Neither is always better. Dry blending gives more texture and control, while solvent blending colored pencils create smoother, more painterly finishes.
Conclusion
Solvent blending colored pencils is one of the most useful techniques for artists who want smoother layers, richer color, and a more polished finish. When you use the right paper, apply the solvent lightly, and build your layers with care, the results can feel almost like paint while still keeping the charm of pencil work.
If you are just starting, test small areas, keep your layers light, and learn how your materials behave together. The more you practice, the more control you will have, and the more intentional your drawings will look. Try the method on a simple study this week, and see how much your colored pencil work can improve.